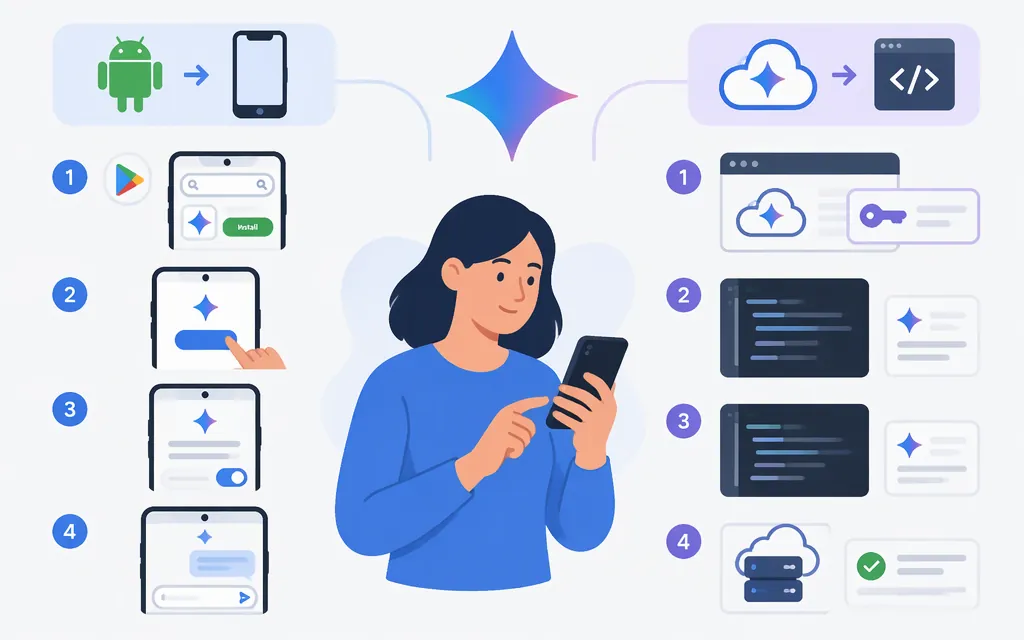
Quick answer: choose the right Gemini setup
If you want to chat with Gemini yourself, set up the Gemini app on your Android device. If you want your software to send prompts to a Gemini model, set up the Gemini API in software running in an environment you control. These are separate routes: app sign-in is not an API credential, and you don’t need an API key just to chat in the app. (Google’s Android setup guide)
Set up Gemini on Android
1. Check your account and device
Google’s current help page lists Android phones and tablets with at least 2 GB of RAM and Android 9 or later as device requirements; Android Go isn’t supported. You need to be signed in with a personal Google Account, or a work or school account that has access to Gemini Apps. Google says users must be at least 13—or the applicable age in their country—and that users under 13 need a parent’s approval. The app can’t be accessed in an Android Work Profile. Availability also depends on location, language, device, and account, so check Google’s current availability information. (Google’s Android availability and setup help)
2. Install or open the app
Find the Gemini app in Google Play and install it, or open it if it’s already on your device. Sign in to the Google Account you intend to use. If you’re using a work or school account and Gemini isn’t available, check with your administrator about your account’s access or license. (Google’s Android setup guide)
3. Send a test prompt
Type a simple question, such as “Give me three ideas for a quick lunch”, and tap Send. A reply in the conversation confirms that app access and text input are working. Voice and attachments are optional: the Android app also supports microphone input and attaching an image or file with the + button. Allow microphone or camera access only if you want to use a feature that needs it. (Google’s Android setup guide)
Want Gemini to open as your phone’s assistant? That’s optional; you can use the app directly. To use Gemini as your primary mobile assistant, Google says the Google app must be set as the device’s default assist app. On many devices, check Settings → Apps → Default apps → Digital assistant app; names and steps can vary by device. (Google’s Android setup guide)
Set up the Gemini API for your software
These steps use Google’s Gemini API and its official Python SDK—not a third-party API service. They show how to prepare a local environment and make a minimal text-generation request. For production, keep the credential on a server, check the model and billing limits for your workload, and don’t expose the key in a browser, mobile app, or source-control repository. Google recommends its official Google GenAI SDK and warns that API keys should be kept secure. (Google GenAI SDK documentation)
1. Create or select an API key
Open the Google AI Studio API keys page. New users get a default project and API key after accepting the terms; if you already have a Google Cloud account, select an existing project or create a key for a project in AI Studio. Copy the key for the next step and keep it private. (Google’s API-key setup guide)
As of May 28, 2026, new keys created in AI Studio are authorization keys by default. Google’s current key documentation says the Gemini API rejects requests from unrestricted standard keys, while standard keys with explicit restrictions continue to work. Follow the instructions shown for your key and project. (Google’s API-key documentation)
2. Install Python and the SDK; set the key in your shell
Use Python 3.11 or later, which meets the current google-genai SDK requirement. In a terminal, create and activate a virtual environment, then install the SDK. (Google Gen AI SDK package requirements)
macOS or Linux (Bash):
python3 --version
python3 -m venv .venv
source .venv/bin/activate
python -m pip install -U google-genai
export GEMINI_API_KEY="PASTE_YOUR_API_KEY_HERE"
Windows (PowerShell):
python --version
python -m venv .venv
.\.venv\Scripts\Activate.ps1
python -m pip install -U google-genai
$env:GEMINI_API_KEY = "PASTE_YOUR_API_KEY_HERE"
Use the API key you copied from AI Studio in place of the placeholder. The environment variable is available to programs started from that same terminal session; set it again in a new session. The SDK’s genai.Client() automatically reads GEMINI_API_KEY. For a deployed service, use your platform’s secret manager rather than a local shell command, and never commit the key to Git or put it in client-side code. (Google’s SDK environment-variable instructions)
3. Make a minimal request
Save this as test_gemini.py:
from google import genai

client = genai.Client()
response = client.models.generate_content(
    model="gemini-3.8-flash",
    contents="Reply with exactly: Gemini API is working.",
)
print(response.text)
Run it in the same terminal session where you activated the virtual environment and set GEMINI_API_KEY:
python test_gemini.py
A successful response prints text. The model ID shown here appears in Google’s text-generation documentation; before shipping, confirm that the model is available to your project and appropriate for your workload. A successful sample request doesn’t test your application’s error handling or capacity at production scale. (Google’s text-generation guide)
4. Check billing, quotas, and credential handling before launch
Google’s API has a Free Tier for certain models, subject to their rate limits. Moving to the Paid Tier requires linking a billing account and prepaying at least $5 (or the equivalent in another currency). Rate limits vary by model and project, so check the current limits in AI Studio rather than assuming a fixed quota. Keep the credential private, monitor usage, and store the production secret on the server that makes the API request. (Google billing documentation; Google rate-limit documentation)
If setup doesn’t work
- The Gemini app isn’t available or won’t open: Check your Android version, RAM, account access, age eligibility, language, and location. Work or school accounts need Gemini Apps access, and the Android Work Profile isn’t supported. (Google’s Android availability help)
- The API test can’t authenticate: Confirm that
GEMINI_API_KEYis set in the same terminal session where Python runs, and check the key and its project instructions in AI Studio. Google says unrestricted standard keys are rejected; standard keys with explicit restrictions continue to work. (Google’s API-key documentation) - The API request doesn’t complete: Recheck the model ID and your project’s current model-specific quotas and billing status; limits vary by model and project. (Google’s model documentation; Google rate-limit documentation)
The app route is for personal interaction; the API route is for integrating Gemini into software. A successful API sample is only a first check: keep the key private and validate access, billing, quotas, and failure handling for your actual deployment.
Sources
Gemini mobile app availability — Android phone & tablet
Get started with the Gemini mobile app — Android phone & tablet
Using Gemini API keys — generateContent API
Google Gen AI Python SDK documentation
Google Gen AI SDK package requirements